
The scenario
A team is using a single DropBox account for document sharing and collaboration even though their organisation has Microsoft 365. They are aware that they really should be using Microsoft 365 systems for this but the thought of moving all those files for all those users is daunting.
The solution? Mover
There are many ways to skin this ‘cat’ and if your file movement needs are small, this is overkill but if you have many users and/or many files,
This example procedure uses Mover to do the heavy lifting between DropBox and Teams/OneDrive. However, Mover can be configured to use a variety of sources and destinations:
- Sources: Amazon S3, Azure Blob, Box, Dropbox, Egnyte, Google Suite/Drive, SharePoint, OneDrive
- Destinations: Azure Blob, Microsoft 365 (OneDrive/SharePoint/Teams), OneDrive (business and consumer).
Preparation
Dropbox preparation
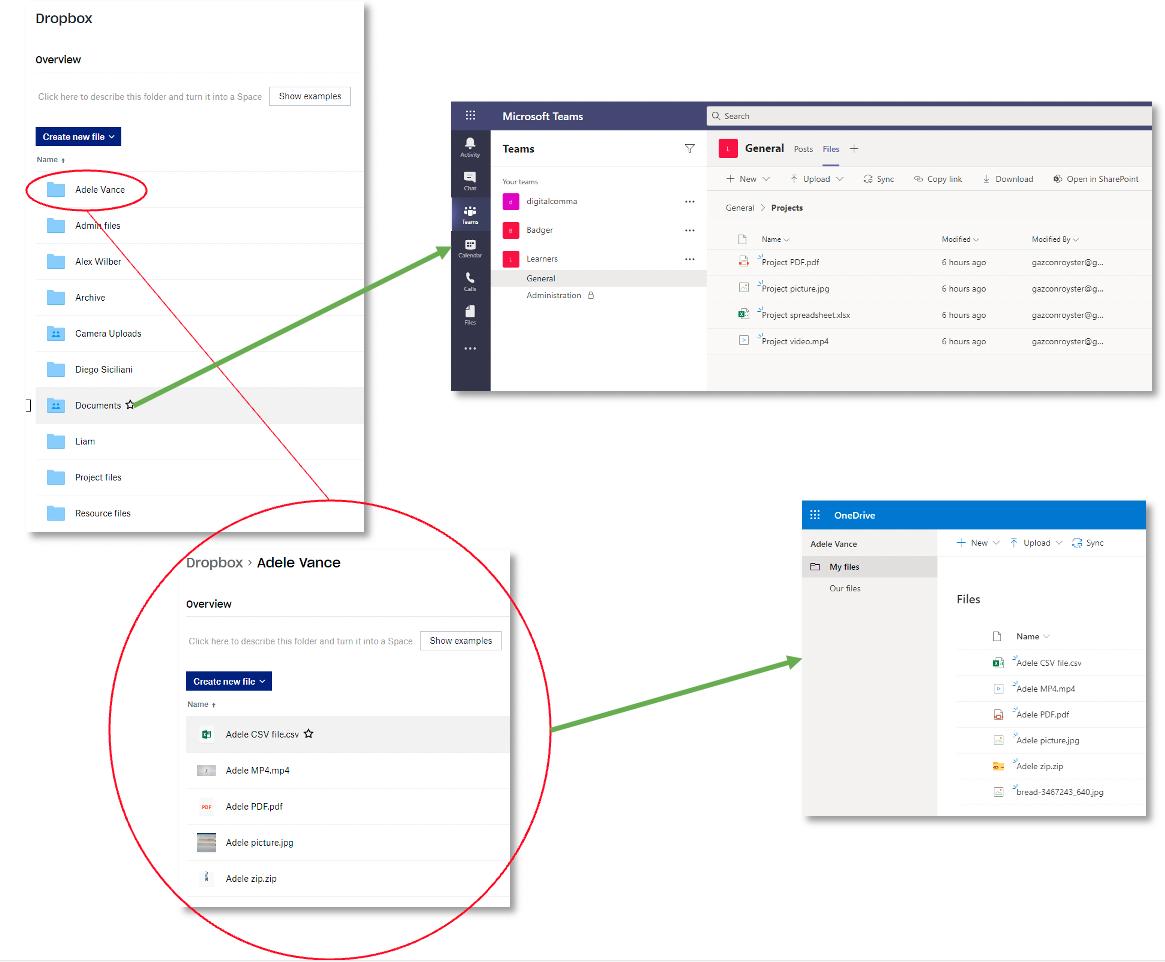
What’s happening here? You are ‘tidying up’ your Dropbox structure to make sure your content is in the best possible shape before migrating it.
- Make sure the personal files for each user are in a specific folder for that user
- Put all the generic files in folders: create these folders for files that all users can access (for instance, you might have one called Resources and another called Projects)
Microsoft 365 Teams preparation
What’s happening here? You are making sure that all your users have access to a specific Microsoft 365 team to replace their old Dropbox system.
- Create a new team (or re-use an existing one)
- Add all the people who used to access the Dropbox system as members of this team
- Create or choose a channel (such as General) to host your migrated Dropbox files, click Files and then create generic folders that match those created on Dropbox (for instance, Resources and Projects)
If there are Dropbox files that general users don’t normally see, replicate this in Teams by creating a private channel for such content (but only give channel access to team owners and other administrative people).
Prepare a migration spreadsheet for the user’s OneDrive accounts
What’s happening here? You are linking each person’s personal Dropbox files to their Microsoft 365 account so that you can subsequently copy these files across to their individual OneDrive.
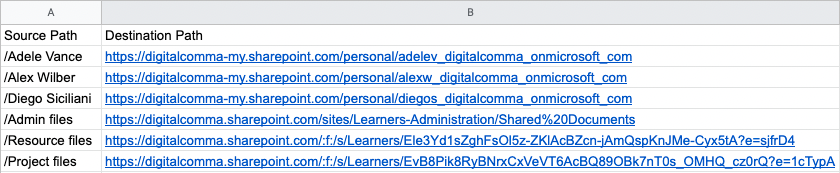
- Create an Excel spreadsheet.
- In the first row, first column, write Source Path
- In the first row, second column, write Destination Path
- In the second row, first column, type a / character immediately followed by the name of the Dropbox folder you are moving content from. For example, /Adele Vance
- In the second row, second column, type the user’s Microsoft 365 email address. For example,
AdeleV@digitalcomma.onmicrosoft.com - Repeat steps 4 and 5 for each user (adding their details to subsequent rows)
- Save the spreadsheet in CSV format. Call it something like migration.csv
Add generic files to migration spreadsheet
What’s happening here? Using the same migration spreadsheet, you are adding the location of generic files for subsequent transfer to Microsoft 365 Teams.
- Open migration.csv
- Find the link for your chosen channel. To do this:
- Open Teams
- Visit the new/existing team (see Microsoft 365 Teams preparation, above), and the channel you have chosen to host the files, perhaps General, and then click Files
- Click Open in SharePoint
- The link you want is everything up to, and including, Shared%20Documents - do not copy anything to the right of that text. For example,
https://digitalcomma.sharepoint.com/sites/Badger/Shared%20Documents
- Paste that link into the second column in a free row and add a / character and the name of the channel to the end of the text string. For example,
https://digitalcomma.sharepoint.com/sites/Badger/Shared%20Documents/General - In the corresponding first column, again write / followed by the name of one of your generic folders in Dropbox. For instance, /Resources
- Repeat steps 3 and 4 for all the generic folders.
- Save migration.csv
If you have set up a private channel or more than one channel, these will require different links (so repeat steps 2 to 4 for them).
Actually moving the stuff
There will be some ‘technical admin’ required when setting up connectors the first time the migration between Dropbox and Microsoft 365 is done. Configuration of this, and the move itself, requires someone with Microsoft 365 Global Administrator access.
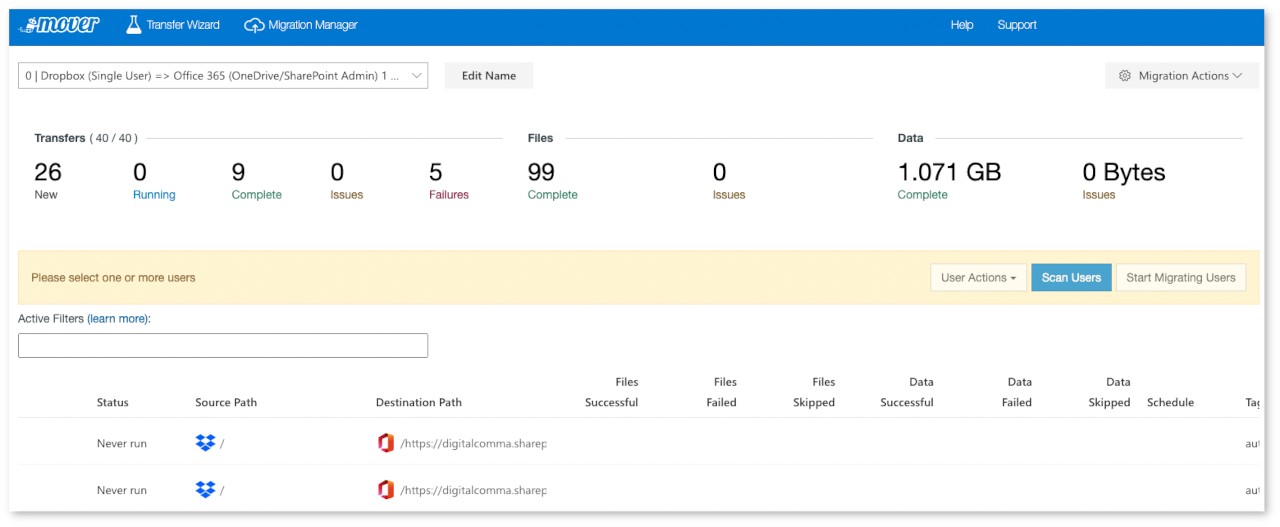
- Sign into app.mover.io using a Microsoft 365 Global Administrator account.
- Select Dropbox (Single User) as the source
- Enter your (admin) Dropbox login details
- Select Office 365 (OneDrive/SharePoint Admin) as the destination.
- Click Continue migration setup
- Click Migration actions and then select Add to Migration
- Under Upload Migration CSV File, upload your migration.csv file
- Click the Tags column to move the list of migrations to the top of the table. Highlight (tick) all the items you just added (they will be tagged with something like ‘csv migration.csv’)
- Click the Scan x Users button. When the scan is complete for all rows (and this scanning can take quite some time - be prepared for hours, not minutes), click Start Migrating x Users.
At the end of this process, your users should find their Dropbox files have been moved to their OneDrive accounts. All generic files will be in your Microsoft 365 team in the folders you specified.


Comments