
Benefits
- Snapshot One place to go for a snapshot of your approval backlog
- Approval central No missed requests and a consistent approach to sign-off (since one primary workflow and workbench handles all requests)
- Reduced emails Relief from the floods of emails generated by approval requests. No hard to track notification emails
- Stability One approval workflow instead of multiple (and multiple potential points of failure)
- More options More approval options for your authors (not just ‘approve and publish’)
- Audit An audit trail of approval actions
- Simplicity A simpler management process means quicker processing and less stalled and missed requests
How to…a summary
Make a SharePoint list. This is the core of the workbench and holds all the useful information for each approval request
Create ‘feeder’ workflows. These will collate the various types of request - approve, review, delete - and feed them to the primary workflow
Create primary workflow. This handles all requests
Create workbench app. This PowerApp allows editors to approve, reject and edit all approval requests
Make a SharePoint list
First choose a site that will host your ‘workbench’ list (for instance, a hub site may be a good location).
Create a list and call it ‘Workbench’ with the fields:
- Title – (the default field)
- Page – Hyperlink
- PageID – Number
- Author – Person
- Approval request – Single line of text
- Approver – Person
- Request time/date – Date and time
- Comments – Multiple lines of text
- Etag – Single line of text
- Processed – Single line of text
Important. Make sure that all your authors have ‘Owner’ access to the workbench list.
Create ‘feeder’ workflows
 In the example given on this page, there are three types of author requests:
- Approve (review and publish)
- Review (but don’t publish)
- Delete
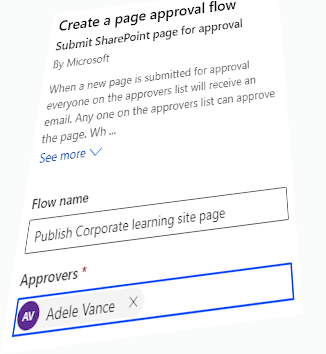
This means that for every site’s ‘Site Pages’ library, you need to configure page approval flow three times. Give each approval flow a unique name (like ‘Publish [sitename] site page’) and an approver (you, initially, but you can edit/add as many as you like later).
First, edit your ‘publish’ workflow
- Open Power Automate to edit your new ‘Publish’ workflow
- Delete the Send me an email notification step.
-
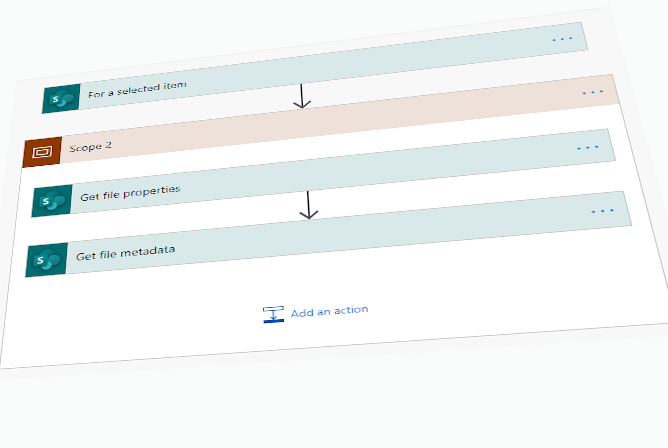
Open (click) the Scope 2 step
- Copy out the Body text from the Send me an email notification 2 step. Save this text in a file (for access later)
-
While still in Scope 2, delete the last three steps:
- Set content approval status - Pending
- Start an approval
- Condition.
At this stage, only Get file properties and Get file metadata will remain in Scope 2.
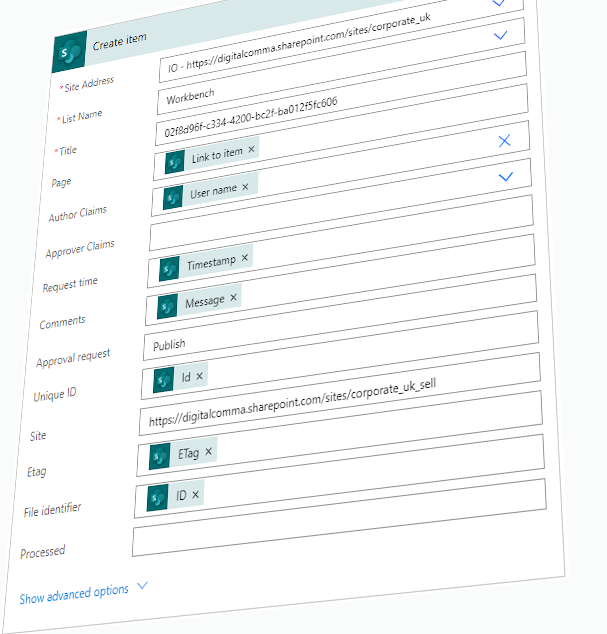
- Click Add an action and choose Create item (SharePoint)
-
Fill in the blanks as follows (note that most of these map to the same fields in your workbench SharePoint list):
- Site Address - from the drop-down, choose the site where your workbench list ‘lives’
- List Name - choose your workbench list
- Title is the ‘guid’ of this site’s ‘Site Pages’ library (find by going to Library settings, open the Enterprise Metadata and Keywords Settings option: the guid is the string between the curly brackets)
- Page is Link to item (which you will find in the ‘dynamic content’ list)
- Author Claims is User name (from the ‘dynamic content’ list)
- Request time is Timestamp (from the ‘dynamic content’ list)
- Comments is Message (from the ‘dynamic content’ list)
- Approval request - write Publish
- Unique ID is Id (from the ‘dynamic content’ list in the ‘Get file metadata’ section)
- Site is the URL for the site you have just added the workflow to
- Etag is ETag (from the ‘dynamic content’ list)
- File identifier is ID (from the ‘dynamic content’ list in the ‘Get file properties’ section).
- Copy the Scope2 field to your clipboard (this cut-and-paste will speed things up for the other two workflows)
- Click Save.
Edit the ‘delete’ and ‘review’ workflows
- Open the workflow and delete the Scope 2 and Send me an email notification steps
- Click the New step button and then under My clipboard, click the Scope2 step you copied from the ‘publish’ workflow
- Edit the Create item step and change Approval request to either Delete or Review (as appropriate)
- Click Save.
Test
At this stage, your authors can request pages to be reviewed, deleted or published but all that happens, for now, is that their requests are recorded in the Workbench list. The ‘doing’ of these requests comes in the ‘primary workflow’ section, below.
However, both to ensure that your workflows are working correctly and to help you get a grasp of what is happening, I’d suggest a bit of testing. That’s as simple as creating one or more of each approval requests: Publish, Delete and Review. After each review request, check the Workbench list to ensure the right kinds of things are being recorded.
You do need to wait a little time for the flows to run (I’m seeing up to a minute’s delay).
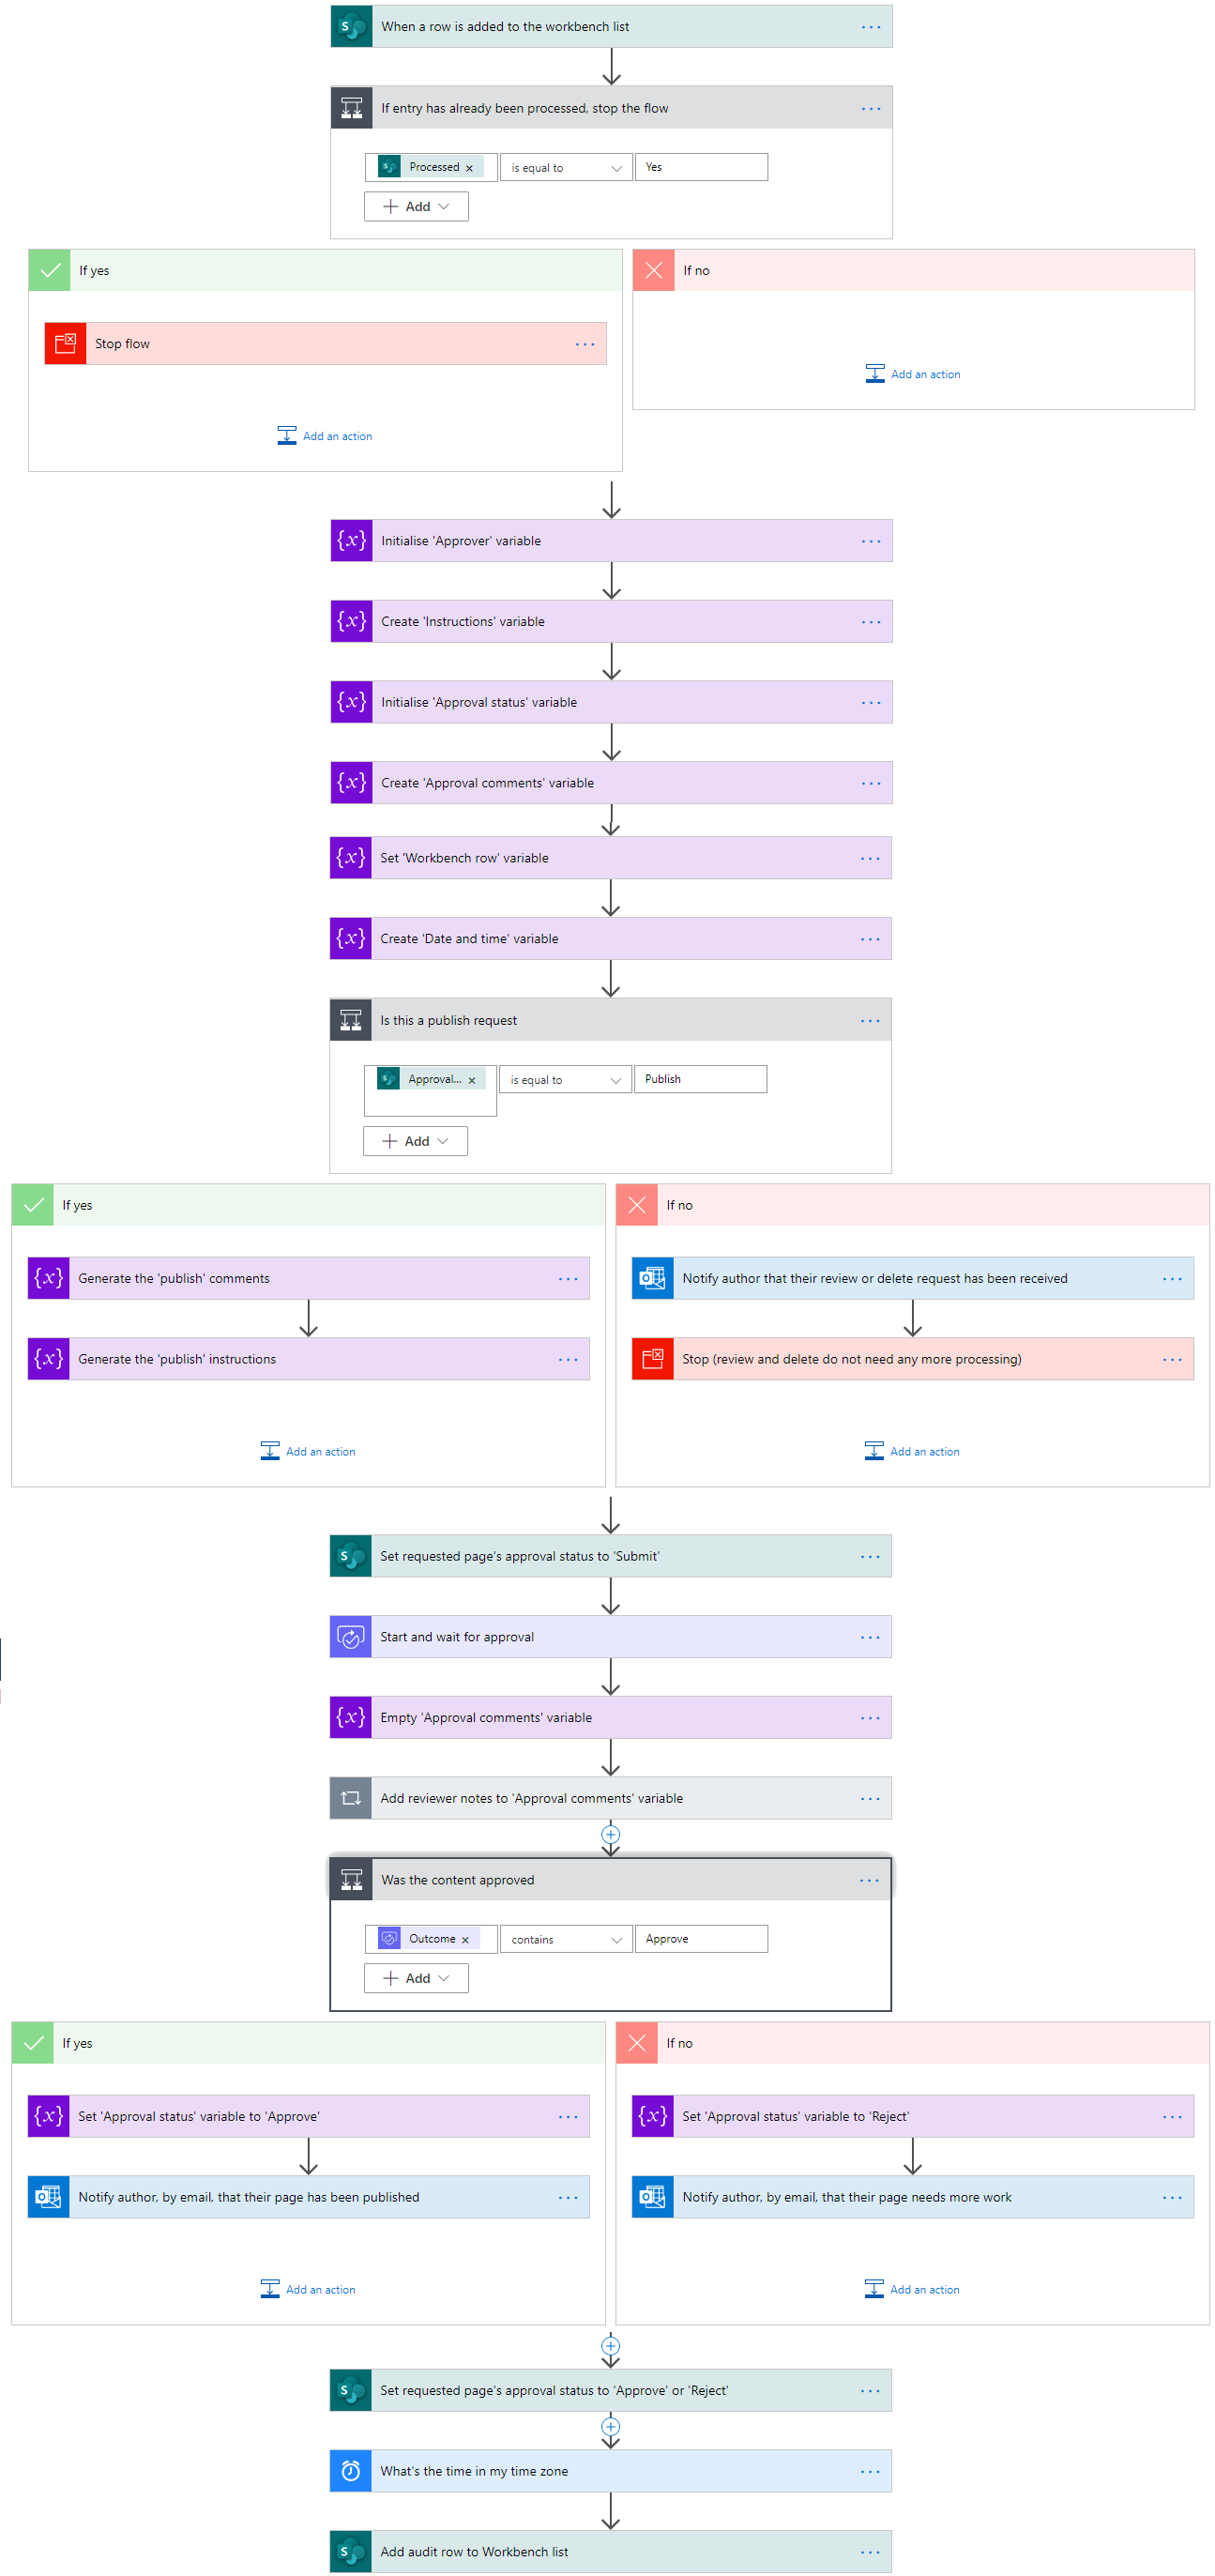
Create primary workflow
Rather than go into too much detail here, I’ve annotated the Power Automate flow to give you an idea of what’s happening. You will need that email text you copied previously for pasting into the email notifications.
A word of caution - Power Automate seems particularly resource-intensive and crash-happy with email steps so make sure you save after you add each of yours.
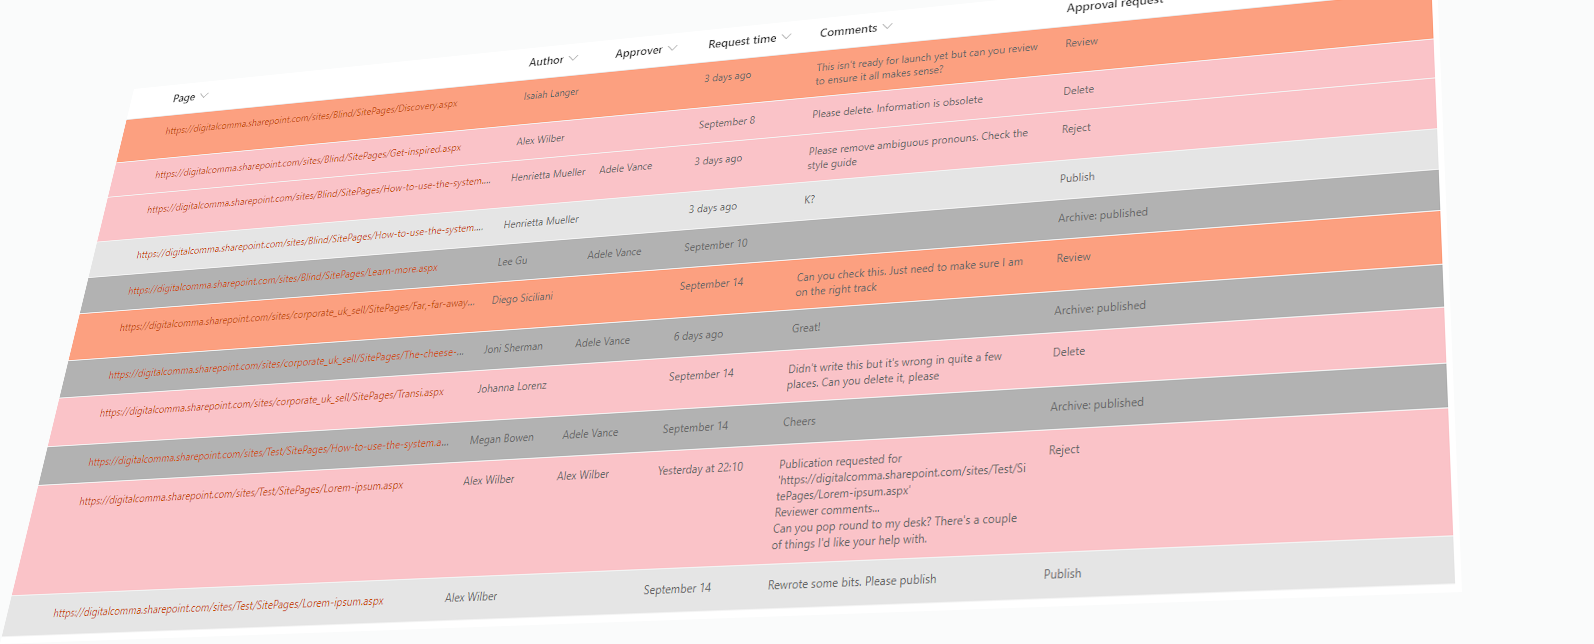
A quick aside: clean your workbench (list)
As it stands, the workbench list isn’t very useful as a human-readable audit trail. So, to clear things up:
- Hide the ‘technical wiring’ fields: Title, Unique ID, Etag, File identifier, Process
- Put the most recent items at the top of the list (but keep pages together). To do this, sort, first by Created (date/time - a hidden field by default), and then by Page
- Drag your column widths so that you can see what you need to see on your page
- Save any changes so they are permanent for this view. You can create different ‘views’ if you wish; for instance, you might want to have a view for just those pages that need deleting
- Add some conditional formatting to colour-code rows. In the example:
- Initial author requests are shaded pale grey
- Pages that must be deleted or that have been rejected are shaded red
- Pages that have been reviewed are shaded orange
- Other pages are shaded dark grey
Tip. Add workbench to your site menu for owners and members (editors and authors).
Create workbench app
Microsoft’s Power Apps have a useful direct connection to SharePoint lists which makes generating apps from such data sources much simpler. If you are new to Power Apps, check out Audrie Gordon’s video ‘walkthrough’ to get a grasp of the basics.
However, for your workbench app, I’d suggest adding individual fields one-by-one to a gallery (it’s a much less frustrating experience overall).
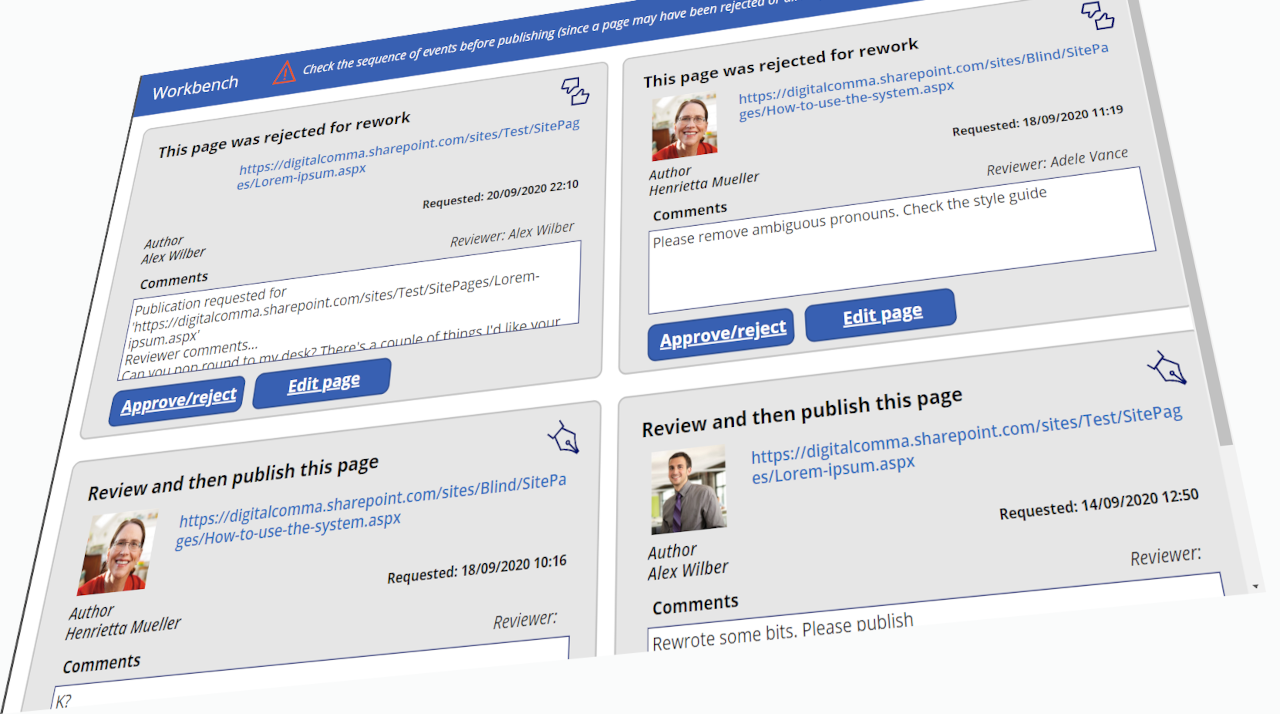
Important. Once you’ve created your workbench app, make sure you share it with the people you want to use it (most likely your publishers and editors).


Comments